Methods for Digitizing Large Format Images and Prints
Broadly the process of digitizing large format images with a camera can be broken down into two components: imaging, and image processing. The following steps work well for an image which would be processed as a black and white line map with the goal of eventually georeferencing the map.

Mount the map on a sturdy board to keep it flat. Use clips where you are able to keep the document flat against the board. Alternatively one could lay the document behind glass, or plexiglass, though this introduces the possibility of glare. This is discussed more later.

If color preservation is a consideration, then you will want to make sure all light falling on it shares the same temperature. Color calibration tools can be used to fine tune even further. For my project, color doesn't matter.
Other final considerations may include if the surface your are imaging is reflective. If so, minimize reflections by re-positioning lights and / or using a polarizing filter. For some work it may be impractical to remove glass or cover from the subject, but if it is then it is suggested. Shooting through less glass is preferable.
Generic camera settings:
• Camera Mode: Tv
• Focal length: between 50mm - 100mm
• ISO: Lowest available setting
• F/stop: Sweet spot
• Tripod: Yes
• Two second timer or remote camera trigger: Yes

Open your raw image in Adobe Photoshop CS. In the raw camera dialog access the transform panel. If your document has neatlines around it, those work great to trace out edges. Where no neatlines are available, the document's corners will suffice.

Use the crop tool to remove any unnecessary portions of the document.
The next steps are intended to bring the document back to its original state. If you are working with a different style of document you may find your workflow differs. Some of the key concepts may remain however.

For my image color data is unnecessary. I will convert the color space to Adobe Monochrome.

Use the sliders to optimize the images appearance. Give consideration to necessary contrast. For all intents this image may as well be only black and white, but I will retain some of the greyscale data to preserve quality. You can see that I've maxed many of the sliders out to that end.
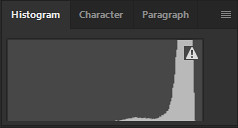
Open the image now to bring it into Photoshop's standard editor. It's always a good idea to keep an eye on the image's histogram as one makes edits. I can see there is a gap on the high end of this histogram. I will correct that by using the auto-contrast tool (Alt+Shift+Ctrl+L) to bring the highs up to white, the lows down to black, and balance the mid-tones.

This looks good, but I think we can get it looking better. In the lower right I see some wrinkles and paper texture. Let's remove that.

I'll duplicate the layer first.
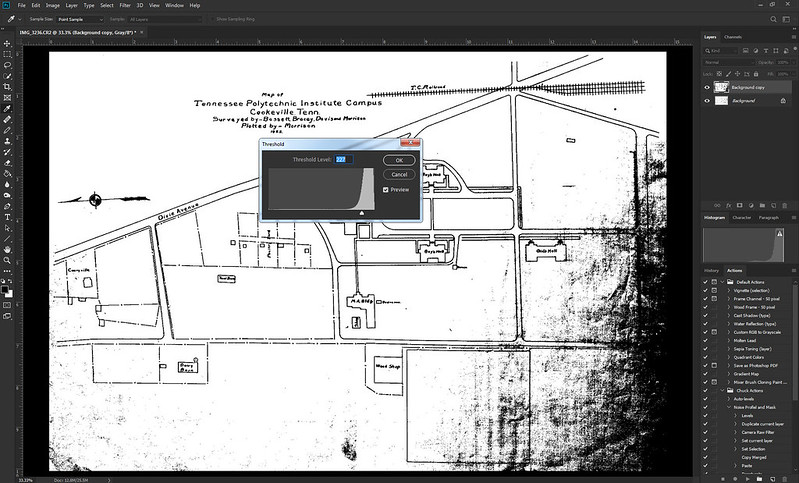
Use the threshold tool (Image > Adjustments > Threshold) to get an idea of the area you should focus on. Do not apply the threshold tool however.

Bring the image back into the raw dialog tool (Filter > Camera Raw Filter | Shift+Ctrl+A) and apply exposure adjustment to the areas in need. The red mask on the above image shows where I applied the exposure adjustments tool with a soft edge. Click OK when done.

Return to the threshold tool (Image > Adjustments > Threshold) and find the sweet spot to remove all the paper texture while not losing information on your document. You may have to go back to the raw dialog a few times to get this part right.

While still working on the background copy layer use the pencil tool to do touch ups and remove minor blemishes.

Change the blending mode for background copy to lighten. This will only allow high luminosity pixel values to pass through. It should leave the background white, and soften the lines if you're working with an image like mine. Zoom and pan around the image while toggling the background copy layer off and on a few times to get an idea of what happens.

Flatten the layers (Layer > Flatten image).

Some of the lines seemed a little light, so I'm using the curve tool (Image > Adjustments > Curve) to darken them.

Before my next steps I will need to rotate the image to get the arrow as close to north up as possible. This will make georeferencing the map much easier. Further, I rotated some of the text to read better with the north up orientation. Since this is a historic document, I made no changes to my original. All changes were made in a copy, and where I was able, I kept all the writing in tact so that it "speaks" from the same voice.
Imaging
Mounting
Mount the map on a sturdy board to keep it flat. Use clips where you are able to keep the document flat against the board. Alternatively one could lay the document behind glass, or plexiglass, though this introduces the possibility of glare. This is discussed more later.
Camera settings
Obviously using a camera with a high resolution (measured in megapixels) is better than using one with a low resolution. The camera will need to be mounted with with a medium focal length lens. For this exercise I used my 50mm (the crop factor on my camera puts that around 70mm). If you photograph regularly you'll be aware that every camera has a "sweet spot" f/stop which maximizes sharpness. If you are unsure, you can always Google your lens or you can just do some basic tests yourself. For my lens I shot at f/7.1. Make sure you are set to photograph in camera RAW. Keep your ISO as low as possible as with all landscape style photography. Use the Tv camera setting and dial all the settings in, letting your camera make its own decisions about exposure length. In an area with low lighting this could mean your exposure may be up to 2 seconds, therefore use a tripod and a 2 second timer to reduce camera shake.If color preservation is a consideration, then you will want to make sure all light falling on it shares the same temperature. Color calibration tools can be used to fine tune even further. For my project, color doesn't matter.
Other final considerations may include if the surface your are imaging is reflective. If so, minimize reflections by re-positioning lights and / or using a polarizing filter. For some work it may be impractical to remove glass or cover from the subject, but if it is then it is suggested. Shooting through less glass is preferable.
Generic camera settings:
• Camera Mode: Tv
• Focal length: between 50mm - 100mm
• ISO: Lowest available setting
• F/stop: Sweet spot
• Tripod: Yes
• Two second timer or remote camera trigger: Yes
Image processing
Orthorectification
Lens distortion as well as minor imperfections in the quality of your document may cause the image to not appear correctly. By the process of orthorectification one can remove some of these errors.Open your raw image in Adobe Photoshop CS. In the raw camera dialog access the transform panel. If your document has neatlines around it, those work great to trace out edges. Where no neatlines are available, the document's corners will suffice.
Use the crop tool to remove any unnecessary portions of the document.
Image improvement and clarification
For my image color data is unnecessary. I will convert the color space to Adobe Monochrome.
Use the sliders to optimize the images appearance. Give consideration to necessary contrast. For all intents this image may as well be only black and white, but I will retain some of the greyscale data to preserve quality. You can see that I've maxed many of the sliders out to that end.
Open the image now to bring it into Photoshop's standard editor. It's always a good idea to keep an eye on the image's histogram as one makes edits. I can see there is a gap on the high end of this histogram. I will correct that by using the auto-contrast tool (Alt+Shift+Ctrl+L) to bring the highs up to white, the lows down to black, and balance the mid-tones.
This looks good, but I think we can get it looking better. In the lower right I see some wrinkles and paper texture. Let's remove that.
I'll duplicate the layer first.
Use the threshold tool (Image > Adjustments > Threshold) to get an idea of the area you should focus on. Do not apply the threshold tool however.
Bring the image back into the raw dialog tool (Filter > Camera Raw Filter | Shift+Ctrl+A) and apply exposure adjustment to the areas in need. The red mask on the above image shows where I applied the exposure adjustments tool with a soft edge. Click OK when done.
Return to the threshold tool (Image > Adjustments > Threshold) and find the sweet spot to remove all the paper texture while not losing information on your document. You may have to go back to the raw dialog a few times to get this part right.
While still working on the background copy layer use the pencil tool to do touch ups and remove minor blemishes.
Change the blending mode for background copy to lighten. This will only allow high luminosity pixel values to pass through. It should leave the background white, and soften the lines if you're working with an image like mine. Zoom and pan around the image while toggling the background copy layer off and on a few times to get an idea of what happens.
Flatten the layers (Layer > Flatten image).
Some of the lines seemed a little light, so I'm using the curve tool (Image > Adjustments > Curve) to darken them.
Before my next steps I will need to rotate the image to get the arrow as close to north up as possible. This will make georeferencing the map much easier. Further, I rotated some of the text to read better with the north up orientation. Since this is a historic document, I made no changes to my original. All changes were made in a copy, and where I was able, I kept all the writing in tact so that it "speaks" from the same voice.


Comments