Layer Blending in Photoshop for Maps
An elevation raster, or DEM, is a great place to start with producing your own basemaps. The DEM can be cooked into a number of other products, which when used with the DEM make pleasing maps. Other layers can be produced from elevation data, depending on how detailed it is. For this tutorial I have used a canopy layer and a TPI layer. If you've not made those yet, check the tutorials I've put together on them here:
Canopy Basemap from Lidar
Topographic Position Index (TPI) as an Alternative to Hypsometric Shading
This tutorial assumes you have access to Photoshop, or GIMP, as well as GIS software to produce raster basemap images for processing.
Here is what our basic ingredients look like.
Elevation

Hillshade

TPI

Canopy

Our mixture of those results in different forms. First, let's look at basic combinations of Elevation and Hillshade.
Combinations of Elevation and Hillshade
Where elevation is set to 50% transparent, and atop a fully visible hillshade, one gets this result. This is the most basic form of hypsographic shading. It is a pleasing effect and works will with most topographic maps where the land is emphasized. This can easily be in ArcMap without invoking Photoshop.

Elevation layering type is set to multiply, and the hillshade is set to 50% transparent. Compared with the previous map, the colors are more vibrant.

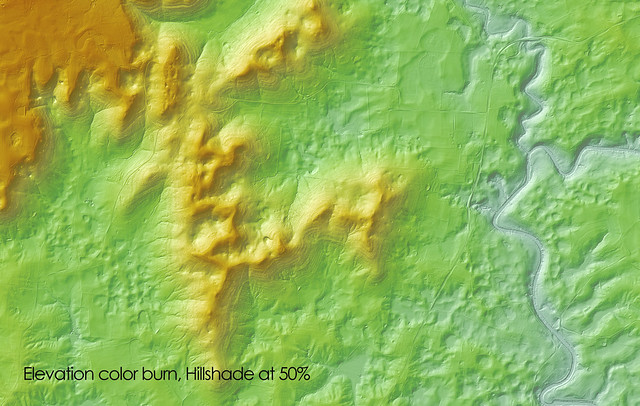
Same as the above layer, except the elevation layer is now set to color burn. The hillshade remains at 50% transparency. The colors are even deeper, and the highlights are more dramatic.
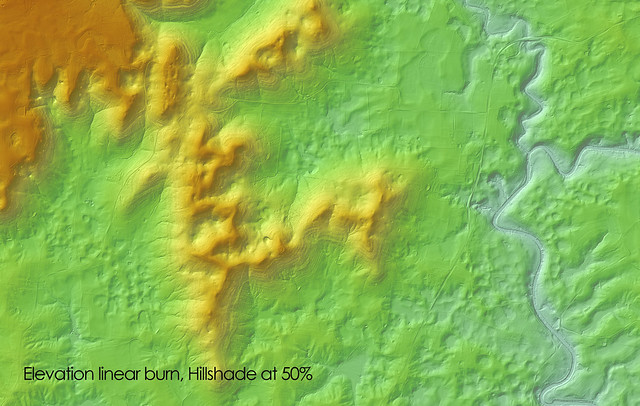
Same as two above, except the elevation layer is linear burn. The hillshade remains at 50% transparency. The colors are deeper, but what above is a highlight here is a midtone.
Elevation layering type is set to color, and the hillshade is set to 50% transparent. This looks like a highly saturated version of the elevation 50% transparent atop a fully visible hillshade.

Combinations of Canopy and Hillshade
Canopy is set to 50% transparent atop a fully visible hillshade. This is a basic configuration, and can easily be done in ArcMap.

Canopy layering type is set to multiply atop a 50% transparent hillshade to get this effect. The colors are deeper.

Canopy layering type is set to color atop a 50% transparent hillshade to get this effect. The colors are more saturated.

Combinations of TPI and Hillshade
TPI is set to 50% transparent atop a fully visible hillshade. This is a basic configuration, and can easily be done in ArcMap.

TPI layering type is set to multiply atop a 50% transparent hillshade to get this effect. The colors are deeper.
TPI layering type is set to color atop a 50% transparent hillshade to get this effect. The colors are more saturated.

Combinations of TPI, Elevation, and Hillshade
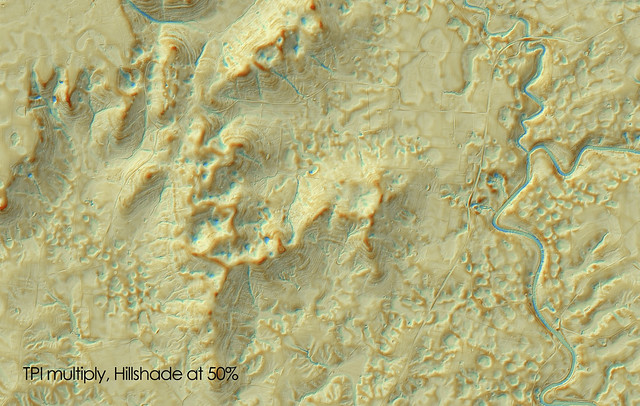
TPI layering type is set to multiply, elevation is set to multiply and at 65% transparency, and hillshade is 50% transparent. This more strongly emphasizes the TPI layer without oversaturating the map.

TPI layering type is set to multiply and at 65% transparency, elevation is set to multiply, and hillshade is 50% transparent. This also ephasizes the TPI layer, but the map is oversaturated.

TPI layering type is set to color and at 65% transparency, elevation is set to color, and hillshade is 50% transparent. This is a more vibrant version of the previous two, and arguably not oversaturated.

Combinations of Canopy, Elevation, and Hillshade
Canopy layering type is set to multiply, elevation is set to color and at 50% transparency, and hillshade is at 50% transparency. This allows some of the hyposographic shading to bleed through underneath the canopy.

Canopy Basemap from Lidar
Topographic Position Index (TPI) as an Alternative to Hypsometric Shading
This tutorial assumes you have access to Photoshop, or GIMP, as well as GIS software to produce raster basemap images for processing.
Here is what our basic ingredients look like.
Elevation
Hillshade
TPI
Canopy
Our mixture of those results in different forms. First, let's look at basic combinations of Elevation and Hillshade.
Combinations of Elevation and Hillshade
Where elevation is set to 50% transparent, and atop a fully visible hillshade, one gets this result. This is the most basic form of hypsographic shading. It is a pleasing effect and works will with most topographic maps where the land is emphasized. This can easily be in ArcMap without invoking Photoshop.
Elevation layering type is set to multiply, and the hillshade is set to 50% transparent. Compared with the previous map, the colors are more vibrant.
Same as the above layer, except the elevation layer is now set to color burn. The hillshade remains at 50% transparency. The colors are even deeper, and the highlights are more dramatic.
Same as two above, except the elevation layer is linear burn. The hillshade remains at 50% transparency. The colors are deeper, but what above is a highlight here is a midtone.
Elevation layering type is set to color, and the hillshade is set to 50% transparent. This looks like a highly saturated version of the elevation 50% transparent atop a fully visible hillshade.
Combinations of Canopy and Hillshade
Canopy is set to 50% transparent atop a fully visible hillshade. This is a basic configuration, and can easily be done in ArcMap.
Canopy layering type is set to multiply atop a 50% transparent hillshade to get this effect. The colors are deeper.
Canopy layering type is set to color atop a 50% transparent hillshade to get this effect. The colors are more saturated.
Combinations of TPI and Hillshade
TPI is set to 50% transparent atop a fully visible hillshade. This is a basic configuration, and can easily be done in ArcMap.
TPI layering type is set to multiply atop a 50% transparent hillshade to get this effect. The colors are deeper.
TPI layering type is set to color atop a 50% transparent hillshade to get this effect. The colors are more saturated.
Combinations of TPI, Elevation, and Hillshade
TPI layering type is set to multiply, elevation is set to multiply and at 65% transparency, and hillshade is 50% transparent. This more strongly emphasizes the TPI layer without oversaturating the map.
TPI layering type is set to multiply and at 65% transparency, elevation is set to multiply, and hillshade is 50% transparent. This also ephasizes the TPI layer, but the map is oversaturated.
TPI layering type is set to color and at 65% transparency, elevation is set to color, and hillshade is 50% transparent. This is a more vibrant version of the previous two, and arguably not oversaturated.
Combinations of Canopy, Elevation, and Hillshade
Canopy layering type is set to multiply, elevation is set to color and at 50% transparency, and hillshade is at 50% transparency. This allows some of the hyposographic shading to bleed through underneath the canopy.


Comments